Getting started with Arista Community Labs
This guide is intended for individuals looking to familiarize themselves with the steps necessary to get started with Arista Community Labs, powered by GitHub Codespaces.
Pre-Requisites
Before launching an Arista Community Lab, the following pre-requisites must be met:
- Arista account(1) with the ability to download cEOS-lab via Software Downloads
- GitHub account
- GitHub Codespaces Access(2)
- Arista user token
-
Need an account? Register here! Arista account registration.
The email address used for the account must be associated with a corporate email domain (no Gmail, Yahoo, etc.).
-
For those that have never used Codespaces before, no worries! There is a quick primer on Codespaces included below.
We can find the user token by logging into arista.com and selecting My Profile.
The tabs below illustrate the steps needed to locate and copy the token:


What's with the token? 
When an Arista Community Lab is started, the user token will be used to automatically download and import the necessary cEOS-lab image into the lab environment.
GitHub Codespaces Primer
Overview
GitHub Codespaces can instantiate a fully configured development or lab environment hosted on GitHub's cloud infrastructure with the click of a button.
Codespaces for Arista Community Labs are pre-packaged with tools such as Python, Ansible, and Ansible Galaxy Collections including AVD, CVP, and EOS.
Docker in Docker in alignment with the Dev Container Specification makes all of this possible with Codespaces.
Costs
GitHub Codespaces is a commercial offering from GitHub. As of October 2024, all GitHub users have 120 hours of Codespace time available for free each month.
By default, if all 120 hours are consumed and the User's Spending Limit for Codespaces is $0, then Codespace usage will stop and cannot continue until the hours are replenished the following month.
When and how would GitHub charge me for this?💰
A GitHub user will never be charged for Codespace usage by default. Codespaces will stop working until the hours are renewed the next month.
Users can define a Payment Method and Spending Limit for Codespaces. Once defined, usage beyond 120 hours can continue as long as the spending limit is not exceeded. Once a defined spending limit has been reached, Codespace usage cannot continue until the next month.
Additional information can be found in GitHub's Codespaces Billing Overivew Page.
What if I forget about my Codespace? 
Don't worry! It won't run forever, at least not by default.
The Default idle timeout and Default retention period values can be modified within GitHub Codespaces Settings.
These parameters can be changed at any time, and should be defined with values that make the most sense for your usage patterns.
A general recommendation for these values is provided below:
- Default idle timeout:
30 Minutes - Default retention period:
1 Day
Codespaces can be deleted at anytime from the Codespaces section of GitHub.
Machine Types
Different machine types are available within Codespaces. As a general rule, the greater the number of CPU cores, the greater number of hours that will be consumed during the Codespace's runtime.
GitHub's Pricing for Paid Usage chart provides the details of the usage multiplier for each available machine type.
For example, as of the writing of this guide:
-
2 CoreMachine Types will consume2hours for every hour of runtime -
8 CoreMachine Types will consume8hours for every hour of runtime -
16 CoreMachine Types will consume16hours for every hour of runtime
Some Arista Community Labs make use of larger machine types, such as the 16 Core option.
My GitHub Account doesn't have access to a larger 8 Core or 16 Core machine types?
By default, some larger machine types may not be available for use. In order to resolve this, a ticket can be opened via GitHub support requesting access to these larger machine types.
Listed below is a template that can be used for this request:
Hello - Can the 8-core and 16-core codespace machine types please be enabled for my account?
The default 2-core and 4-core machines lack the necessary resources for my use cases.

Thank you!
Once completed, select Create a Ticket
Starting the Lab
Note
All community labs hosted via Codespaces will follow a similar process to the one defined below. Labs that contain exceptions to the process below will have this specifically called out via a note associated with the lab launch button.
Once a lab has been launched via it's respective 'Start Lab' button, a Create Codespace window will be opened via a web browser:

In the ARTOKEN field, paste the user token copied from your arista.com user profile.
This is a one time requirement, and will be saved for all subsequent Arista Community Lab deployments.
Where is the token saved? 
Once entered, the token is saved as a GitHub Codespaces Secret. This can be viewed via the Codespaces section of GitHub account settings.

Watch the expiration date! 
User tokens on arista.com have an expiration date listed in the Token Valid Till field in the Portal Access section of the user profile.
If the token has expired, click Regenerate Token to create a new one. A token expires one year after it was generated; the user cannot modify this value.
Once the token has been entered, and Create new Codespace has been selected, a new tab will open in the browser containing the codespace
Wait...the codespace opened in my local VS Code!
Not a problem! This just means that VS Code is locally installed and Visual Studio Code is selected in the Editor preference section of the GitHub account's Codespaces settings.
In the newly launched Codespace, a tab is opened displaying an overview of the lab.
The Post Deploy Script can be seen running in the terminal.

Grab a coffee! 
Depending on the size of the lab, the post deployment script will take between five and ten minutes to complete.
Once the post deployment script has completed, the terminal prompt will change to the GitHub username followed by the name of the lab.
In the screenshot below, the GitHub username is mitchv85 and the lab is techlib-eos-tips.

At this point, the lab is ready to go! Running the following command in the terminal will provide an overview and status of all deployed nodes:
make inspect

Lab didn't start? 
If the lab did not start up correctly, please check out the Tips and Troubleshooting section of this guide.
If this section does not contain a solution, please open an issue on the Arista Community Labs repository.
Interacting with the Lab
Accessing Lab Nodes
Once the lab is up and running, open the ContainerLab extension by clicking it's icon within the Codespace.
Once in the ContainerLab extension, establish SSH connectivity to any node by expanding the lab topology, right-clicking on the node, and selecting Connect to SSH.
After selecting Connect to SSH, a new tab containing the SSH session to the selected node will be opened in the terminal window.


Check Lab Status
The status of a lab can be checked at any time in the ContainerLab extension by right-clicking the lab topology name selecting Inspect Lab.
Once selected, a new tab displaying the status of the lab topology will be automatically opened.


Stop the Lab
A lab can be stopped at any time by right-clicking the lab topology within the ContainerLab extension and selecting Destroy.
Once the lab has been successfully stopped, a prompt will be shown in the Codespace indicating that it was successfully destroyed.


What about the Codespace?
Stopping the lab via the ContainerLab extension will stop the cLab topology.
It will not stop or destroy the Codespace itself.
There are two common methods for the Codespace itself to be stopped or deleted
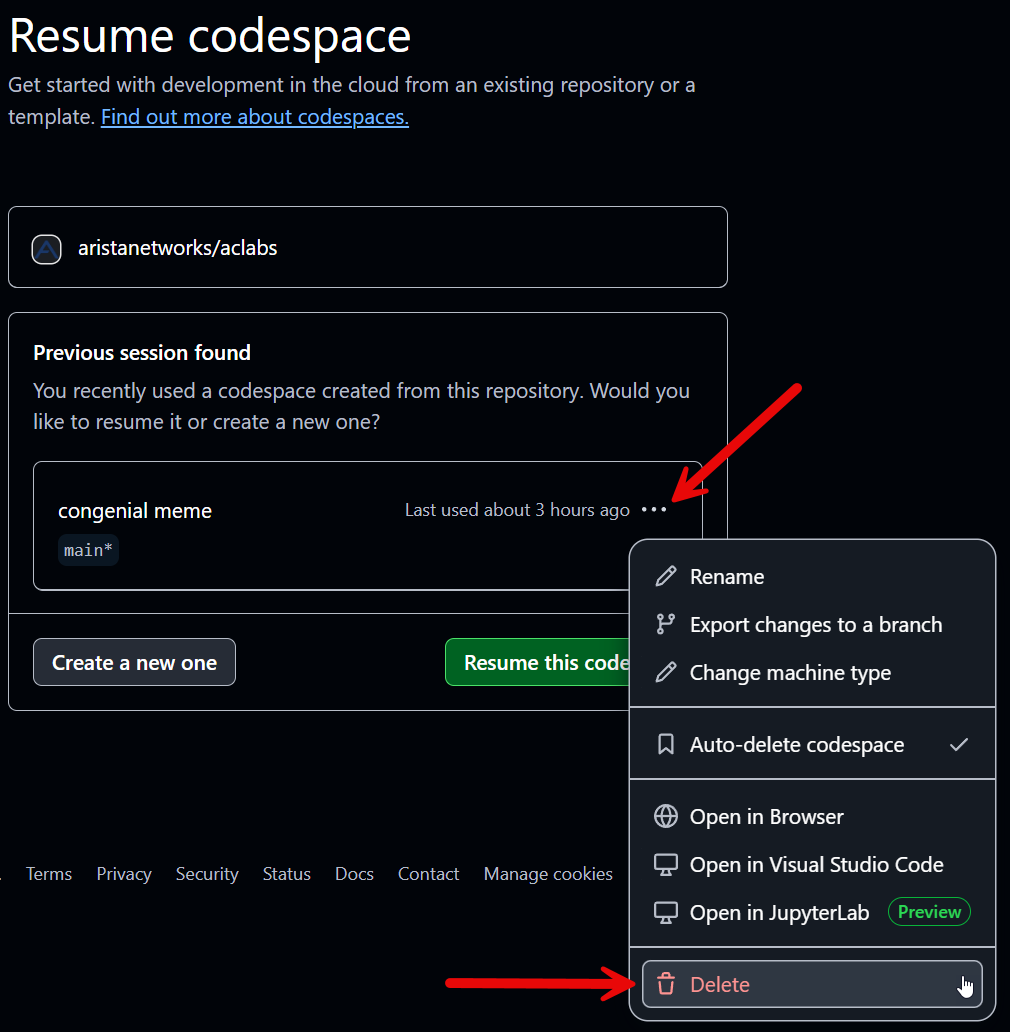
- Manually stop and/or delete the Codespace via you GitHub Codespaces Dashboard (1)

Delete Codespace (Click to Zoom)
- Wait for the
Default idle timeoutandDefault retention timetimers to expire in your GitHub Codespaces Settings (1)

Codespace Timers (Click to Zoom)
Restart the Lab
If stopped, a lab topology can be started back up by right-clicking on the topology and selecting Deploy within the ContainerLab VS Code Extension User Manual.
If the intent is to restart a lab that is currently running, then select the Redeploy option.


Additional features and functionality provided by the ContainerLab VS Code extension can be found in the ContainerLab VS Code Extension User Manual.
A list of all codespaces can be found in the Codespaces section of GitHub. From here, a codespace can be resumed, stopped, deleted, renamed, and more!
Conserve those hours! 
The Default idle timeout and Default retention period values can be modified within GitHub Codespaces Settings.
These parameters can be changed at any time, and should be defined with values that make the most sense for your usage patterns.
A general recommendation for these values is provided below:
- Default idle timeout:
30 Minutes - Default retention period:
1 Day
Tips and Troubleshooting
Tip 1 - 'docker login': denied
During the initial lab provisioning, the user's Arista Access Token is used to download cEOS-lab into the Codespace and import it into Docker.
In the event that the user's Arista Access Token has expired, or is not present, the lab will fail to download cEOS-lab from arista.com and attempt to download the cEOS-lab image from DockerHub.
When this happens, the lab terminal will display the following message:
Error: Error response from daemon: pull access denied for arista/ceos, repository does not exist or may require 'docker login': denied: requested access to the resource is denied
make: *** [Makefile:9: start] Error 1
I don't see any error messsages, but my lab didn't start! 
If the Codespace Creation Log is not automatically opened, it can be accessed via the VS Code Command Palette:
-
Open the Command Palette by using the key combination aligned to your OS
- Ctrl+Shift+P
- Cmd+Shift+P
- Enter
Viewinto the Command Palette prompt (1)

View Creation Log (Click to Zoom)
- Select
Codespaces: View Creation Log
This will open a full creation log including what errors may have been encountered during the Codespace creation process.
An expired or non-existent Arista user token will result in either an Authentication Failed when downloading cEOS-lab from arista.com or docker login: denied
When a token is created in a user's arista.com profile, it is valid for one year.
Follow the steps below to generate a new token and update the ARTOKEN secret used by acLabs Codespaces.
- Open your arista.com user profile
- Choose
Regenerate Token

- Copy the token
- Update the
ARTOKENvalue in your GitHub Codespaces Settings(1)
 In the event that the
 ARTOKENsecret doesn't exist in your GitHub Codespaces Settings, chooseNew secretand create it.This value is created automatically the first time an acLabs lab is launched, but in rare situations this auto-creation may not occur.

Once updated, launch a new acLab(1) and get back to labbing! 
- It's recommended to delete the Codespace where the failure occurred, and instead create a new one by choosing
Create a new onewhen prompted to resume the failed Codespace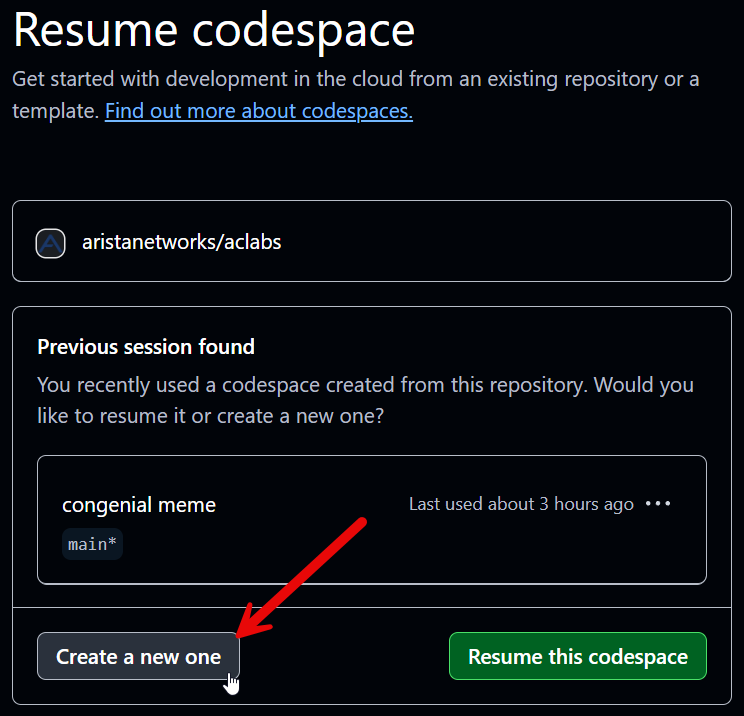
Tip 2 - Resuming an acLab
By default, GitHub Codespaces will automatically shutdown(1) after 30 minutes, and will be deleted(2) after 30 days of inactivity.
- Default idle timeout
- Default retention period
These Default idle timeout and Default retention period parameters can be changed at any time within GitHub Codespaces Settings.
A general recommendation for these values is provided below:
- Default idle timeout:
30 Minutes - Default retention period:
1 Day
If the Default idle timeout has been reached, then a user may find themselves presented with the following message when re-launching the lab:

Multiple choices exist at the above prompt:
- Create a new instance of the lab in a new Codespace (1)
- Resume an existing lab that was shutdown due to the idle timeout being reached
- Delete the existing codespace(2)
- Disregard the remainder of this section and jump into the lab!

Select Resume this codespace to bring the codespace back up.
Once the Codespace is ready(1) the lab can be resumed via the ContainerLab extension by right-clicking the lab name and selecting Redeploy
- If the terminal is open and responsive, the Codespace is back up and running!

After selecting Redeploy, the terminal will present a message indicating that ContainerLab is in the process of redeploying the lab.
If desired, select View Logs to monitor the process of the lab as it is started back up.

When complete, a message indicating success will be presented and it's time to jump back into the lab! 
 Happy labbing!